It should be the most elementary of projects: There’s water coming in, so you need to find and fix the leaks. Only after you chase leaks, call the roofing contractor back (again), and get more involved than you ever wanted to be can roof leaks truly be fixed.
Depending on your roofing files, you may be lucky enough to have retained the address and phone number of the roof-contracting firm that installed the roof system. But, suppose the roof is more than a couple of years old.
You’ll find out the hard way that the roofing contractor’s warranty only covered workmanship – and only for the first 2 or 3 years. (Still, it’s always a good idea to have the original contractor find and fix defects.) Ongoing maintenance programs between the roofer and building manager do exist, with costs for time and materials spelled out in advance.
You may have a copy of the manufacturer’s roof warranty and discover (to your satisfaction) that the roof is still under warranty. If you’ve followed the manufacturer’s warranty instructions, you have formally contacted them for help with the leaks. Only approved contractors can do repairs under the manufacturer’s warranty. There have been many mergers in the roofing industry, so it may take some serious probing to find out who’s currently honoring the warranties. Some major roofing manufacturers have left the roofing field entirely, but may have a technical expert available to assist in resolving issues with outstanding warranties.
Getting Something Done
Many building owners and managers have trained (and, hopefully, retained) in-house staff members to handle roof issues. These staff members should be capable of more than just putting buckets out when the leaks appear. Training programs are available online from material manufacturers as well as from RCI Inc. (formerly the Roof Consultants Institute). For building owners with multiple buildings, some material manufacturers even offer to conduct hands-on programs for your staff and may permit them to perform the warranty repairs. (Generally, these will be for weldable thermoplastics, such as PVC, TPO, and copolymers.)
Many older buildings have cellulosic thermal insulation, such as wood fiber and perlite, or an open structure that water can pass through, such as glass fiber. In these cases, moisture surveys using infrared, nuclear, or capacitance techniques can detect wet insulation. They don’t find leaks, but they will show you where the water is now. Unfortunately, the closed cell foams (isoboards, polystyrene, foamed glass) don’t hold or pass water very easily. Infrared might show where water is flowing in the channel between boards; wet, curled edges of foam boards may show up as “picture frames.”
A Few Helpful Hints
Start with the structural deck. Your roofing file may tell you what this is, or you may have to lift a few ceiling tiles to get a peek. If the deck is steel, remember that the leaking water will try to follow the direction of the slope; if the deck corrugations are parallel to the slope, then the water will run downhill until it finds a gap, such as a lap in the decking or a hole. If the deck is properly sloped to drain, the water may be coming in because the deck was cut to accommodate the drain bowl, but the hole in the deck was never sealed.
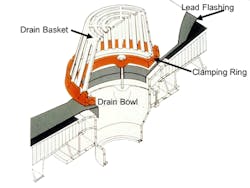
Check the drain from the roof side. Remove the screen and see if the bolts that squeeze the clamping ring to the drain bowl are there, or if a couple of bolts are loose or have broken off. Just like when bolting the spare tire to your auto wheel, the bolts should work in tandem, squeezing the membrane uniformly to create a watertight gasket (see Fig. 1).
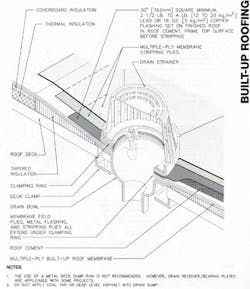
In bituminous systems, there is usually a lead sheet that has been installed over all the plies of the roof membrane. Generally, it was installed in asphalt mastic and malleted down to conform to the sump below. This lead sheet should then have been stripped in using a couple of felt plies centered over the edges of the lead sheet (see Fig. 2). The lead, in turn, has been hammered down into the drain bowl. Since water is going to be flowing toward the drain, these elements need to be intact.
Figure 2. (larger image)
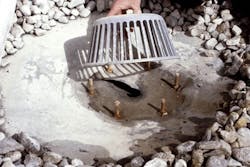
A hose test, starting at the drain itself, can be revealing. Lots of items have been found in blocked downspouts, including the head of a roofing mop, work shoes, rags, and bottles (see Fig. 3). If the drain flows freely and no water shows up inside, gradually move the hose upstream.
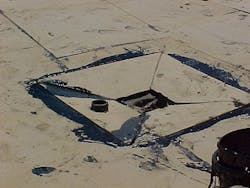
In Fig. 4, the drain flashing in an EPDM single-ply roof was never completed. There should be water cut-off mastic under the rubber at the drain bowl to prevent leakage. The pilot hole in the membrane should have been enlarged to match the outlet, and the drain clamp is missing.
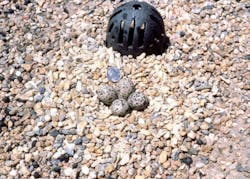
Fig. 5 shows a nest of killdeer eggs. These clever birds know that the drains are always located next to building columns and are not subject to deflection; hence, the eggs will always be high and dry.
On roofs with a lot of equipment, mechanical units are always suspect, especially if frequent maintenance (e.g. to replace filters, fan belts, etc.) is necessary. Access doors may not be tightly sealed or might be missing completely (see Fig. 6). Hose tests may identify leak sources quickly. (Having an associate down below with a cell phone or walkie talkie is recommended.)
Figure 6.
Roof flashings are always under suspicion because flashings make a connection between different roof components at a change of elevation, such as at the intersection of the deck and wall. Thermal or structural movement increases stress at these locations, usually manifested as diagonal wrinkling, tearing, or pulling away from the wall (see Fig. 7). Fortunately, torch-grade modified bituminous materials are now available to make durable repairs.
Flashings at roof scuttles or perimeter walls are places where people are prone to kick the flashings or impact them with their toolboxes and the like.
If the roof has ponding water (usually due to deck deflection), it may be possible to install new drains at the low spots. One trick is to place bricks in the deepest puddles and, as the water evaporates, move the bricks to the spots that are still wet. Since you have not changed the roof drainage area, you can hook the drains up to the existing downspouts under the deck and still meet the plumbing code.
If you find a puddle in a donut shape around the drain, the drain needs to be recessed. The thickness of the lead flashing and stripping plies could be the problem, and forming a sump so the extra plies are below the roof level is a worthwhile repair (see Fig. 8).
Roof membranes are penetrated for all sorts of reasons. Sheet-metal pans are placed over the roof membrane; the pitch-pocket is then filled with a waterproof sealant. The sealant will shrink over time and can be maintained by adding more filler – usually fibrated asphalt mastic, as shown in Fig. 9. More durable and flexible filler materials are also very versatile, such as at the penetration with multiple conduits in Fig. 10.
Figure 10.
Repair Manual for Low-Slope Membrane Roof Systems, a joint publication of the National Roofing Contractors Association (NRCA), the Single Ply Roofing Industry (SPRI), and the Asphalt Roofing Manufacturers Association (ARMA), is highly recommended.
A directory of roofing consultants is available at www.rci-online.org.
Consult the following resources for more information:

